Struggling with your child’s buttons and zippers is a sign they need more than just generic play; they need targeted activities to build foundational motor pathways for independence.
- Focus on « scaffolded » activities that progress from simple to complex, like moving from dry to wet pouring to build control.
- Isolate specific movements, such as the pincer grasp with stickers or the tripod grasp with pipettes, to build targeted muscle memory.
Recommendation: Start with one low-pressure activity, like a dressing board, to build confidence and make skill-building feel like a game, not a chore.
The morning rush, a half-dressed child, and a zipper that just won’t connect. It’s a scene of parental frustration familiar to many. When your child struggles with what seem like simple tasks—fastening a button, zipping a coat, holding a crayon—it’s easy to feel a pang of worry. You’ve likely been told to try puzzles, building blocks, or Play-Doh. While these are wonderful tools for development, they can feel like a scattergun approach when what you need is a targeted solution.
As a pediatric occupational therapist (OT), I see fine motor skills differently. It’s not just about « hand strength. » It’s about a hierarchical pyramid of skills where shoulder stability, wrist control, and motor planning form the essential foundation for what the fingers can achieve. The problem isn’t always the fingers themselves; it’s often the support system that hasn’t been fully built. This is why some children need more than just generic play; they need a scaffolded progression of activities designed to build specific brain-body pathways.
This guide is designed to give you that targeted approach. We will move beyond the common advice and explore eight specific, almost magical activities. I’ll break down exactly why each one—from the precision of pouring water to the simple joy of peeling a sticker—is a critical building block on the path to zipping that coat and achieving true functional independence.
To help you navigate this journey, this article breaks down key activities and developmental insights. You’ll find a series of targeted exercises and expert advice structured to build skills progressively, from foundational movements to complex, real-world tasks.
Summary: A Pediatric OT’s Guide to Building Functional Independence
- Dressing Boards: Practicing Fasteners Without the Pressure of Getting Dressed
- Montessori Pouring: Developing Control and Precision with Jugs
- Sticker Peeling: The Surprising Dexterity Challenge
- Pipette Play: Strengthening Fingers for Writing Endurance
- The Bunny Ears Method: Teaching Tying Without Tears
- Pincer Grasp: Using Tweezers and Beads to Prep for Pencils
- The 2-Year Progress Check: What Happens If Your Child Misses a Milestone?
- Creative Arts and Motor Skills: Why Messy Art is Essential for Writing Later
Dressing Boards: Practicing Fasteners Without the Pressure of Getting Dressed
The morning routine can be a source of stress when a child is struggling with buttons and zippers. A dressing board or frame isolates these tasks from the emotionally charged context of getting dressed and leaving the house on time. By removing the pressure and the awkwardness of working on their own moving body, a child can focus purely on the mechanics of the fastener. This is a crucial first step in building motor planning and muscle memory. The problem is widespread; 77% of PreK-3 teachers reported fine motor skills like using scissors and fastening clothes have become more challenging for children.
The goal here is bilateral coordination—the ability to use both hands for different tasks simultaneously. One hand must stabilize the fabric while the other manipulates the button or zipper pull. A dressing board, whether store-bought or a simple DIY version on cardboard, provides a stable, predictable surface to master this coordination. You can start with large buttons and wide holes, gradually progressing to smaller and more complex fasteners like snaps, buckles, and hooks. This scaffolded approach builds not just skill, but confidence, transforming a source of frustration into a solvable puzzle.
By practicing in this low-stakes environment, the child develops a « body map » for the movement. When they return to dressing themselves, their hands already know the sequence. This separation of practice from performance is a powerful therapeutic tool that turns a « can’t do » task into a « can do » skill, paving the way for greater independence and a much smoother morning for everyone.
Montessori Pouring: Developing Control and Precision with Jugs
An activity as simple as pouring water from one jug to another is a powerhouse for fine motor development. It may seem unrelated to buttoning a shirt, but the skills it builds are fundamental. Montessori pouring develops wrist stability, hand-eye coordination, and the ability to grade movement—that is, using just the right amount of force and control. When a child pours without spilling, they are practicing the same precise control needed to guide a zipper pull along its track or align a button with its hole.
The progression starts simple, often with dry goods like rice or beans poured between two wide-mouthed pitchers. This allows the child to learn the motion and develop bilateral coordination without the mess of spills. As they master this, they can move to pouring water, which provides immediate, tangible feedback—a spill is a clear « error » that the child can learn to self-correct. This builds concentration and a sense of responsibility. Progressing further involves pouring into smaller openings or to a specific line marked on a glass, refining their judgment and precision.
Case Study: How Water Pouring Builds the Mathematical Mind
A Montessori study observed that children who mastered water pouring not only gained independence (pouring their own drinks) but also developed mathematical thinking by learning to estimate volume. The activity builds concentration through multi-step sequences and coordination through spill-free serving. It facilitates the crucial transition from a whole-hand grasp to more refined pincer movements, which is an essential indirect preparation for holding a pencil and writing.
Ultimately, this practical life skill translates directly into functional independence. A child who can confidently pour their own juice at the breakfast table is exercising the same wrist control and steady hands needed for countless other self-care and academic tasks. It’s a perfect example of how a simple, purposeful activity can build a complex network of foundational skills.
Sticker Peeling: The Surprising Dexterity Challenge
Peeling a sticker off its backing sheet seems like simple fun, but for an occupational therapist, it’s a high-value fine motor workout. This single activity is a masterclass in developing the pincer grasp—the precise coordination of the thumb and index finger. This is the very same grasp a child will use to pick up a bead, fasten a small button, or hold a pencil for writing. The thin, delicate edge of a sticker demands a level of dexterity and fingertip sensitivity that few other preschool activities can match.
The act of peeling requires several distinct skills to work in harmony. First, the child must use one hand to stabilize the sticker sheet (bilateral coordination). Then, they must use the fingertips of the other hand to isolate the sticker’s edge, requiring finger isolation and tactile perception. Finally, they must pull the sticker away without tearing it, a lesson in graded force and motor planning. Placing the sticker onto another surface adds another layer of challenge, requiring them to aim for a target and release the sticker cleanly.
This is why sticker activities are a go-to tool in therapy. As educational toy researchers have noted, the process is rich with developmental benefits. It’s a motivating, engaging, and self-contained way to practice the foundational movements for countless daily tasks.
occupational therapists often have children transfer stickers from one paper to another during treatment since it utilizes multiple aspects of visual tracking, motor planning, and execution
– Educational toy development researchers, Sticker Books Child Development Study
For a child struggling with dexterity, start with larger, thicker foam stickers that are easier to grip. As their skills improve, you can move to smaller, standard paper stickers to refine their pincer grasp and prepare their hands for the intricate work of writing and self-care.
Pipette Play: Strengthening Fingers for Writing Endurance
Does your child complain that their hand gets tired when drawing or trying to write? This is a common issue, and it often points to underdeveloped muscles in the hand, specifically those used for the tripod grasp (the way the thumb, index, and middle finger work together to hold a pencil). Pipette or dropper play is one of the most effective and playful ways to strengthen these specific muscles. Squeezing the bulb of a pipette isolates and exercises the exact same small muscles needed for a functional and enduring pencil grip.
This lack of hand endurance is a growing concern, as research shows handwriting difficulties affect between 10% to 34% of school-aged children. Pipette play directly counteracts this by making muscle-building fun. Start with water and food coloring, setting up a « potion-making station. » The child will be so engaged in mixing colors and transferring liquids that they won’t even realize they’re doing therapeutic hand exercises. The repetitive squeeze-and-release motion builds strength and stamina in a way that simply holding a crayon cannot.
To increase the challenge and the strengthening benefit, you can introduce a graded resistance progression:
- Level 1: Start with plain water and standard pipettes to introduce the squeezing motion.
- Level 2: Add food coloring to create color-mixing experiments, keeping resistance low while building visual interest.
- Level 3: Progress to slightly soapy water, which increases viscosity and requires more finger strength.
- Level 4: Use thinned washable paint for art projects, further increasing resistance in a motivating activity.
- Level 5: Challenge with even thicker liquids in smaller pipettes to maximize muscle strengthening and build writing endurance.
This scaffolded approach ensures that the child is always challenged but never overwhelmed, systematically building the finger strength necessary to hold a pencil correctly and write without fatigue.
The Bunny Ears Method: Teaching Tying Without Tears
Tying shoelaces is the Mount Everest of early childhood fine motor skills. It is a notoriously difficult task that combines a complex sequence of movements, bilateral coordination (both hands doing different things), and the need to cross the body’s midline. It’s no wonder that it’s a source of frustration for so many children and parents. For many kids, the standard « loop, swoop, and pull » method is too abstract and happens too quickly. The « Bunny Ears » method, however, breaks the process down into a more intuitive, symmetrical, and memorable story.
The beauty of the Bunny Ears method (making two loops, or « ears, » and then tying them in a simple knot) is its simplicity and symmetry. Both hands are doing the same thing at the same time, which is much easier for a developing brain to process than the asymmetrical movements of the standard method. This approach follows a core principle of motor learning: going from gross to fine. Before even touching a shoelace, you can practice the sequence with large-scale materials. Use thick ropes, jump ropes, or even pool noodles to learn the « bunny ears » knot with whole-body movements. This allows the child to internalize the motor plan without the frustrating fiddliness of tiny laces.
Developmental research shows this gross-to-fine progression is key. Children first need to understand the sequence with large, clear movements before they can translate it to the fine motor challenge of laces. By starting big—practicing on a tying board or even on a parent’s shoe—you remove the pressure and focus on the steps. The Bunny Ears method provides a simple narrative and symmetrical actions that make this complex task achievable, turning tears into a proud moment of accomplishment.
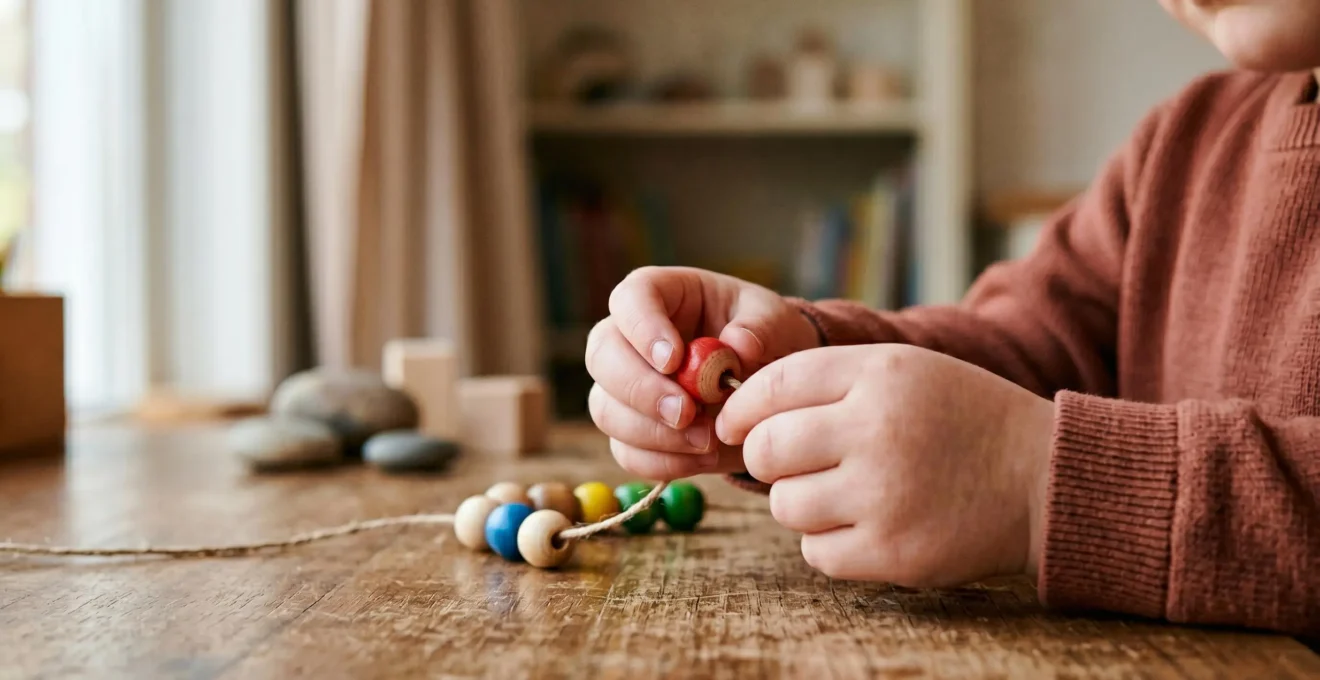
Pincer Grasp: Using Tweezers and Beads to Prep for Pencils
The pincer grasp is the cornerstone of so many fine motor skills. It’s the delicate and precise opposition of the thumb and index finger used to pick up the smallest of items. While peeling stickers is an excellent starting point, introducing a tool like tweezers takes this skill to the next level. Using tweezers forces the fingers into the correct position and helps to isolate the movement, preventing the child from compensating by using their whole hand. Activities like transferring pom-poms, beads, or other small items from one bowl to another with tweezers are a direct-to-the-point pincer grasp boot camp.
This type of tool use is a critical developmental step. It teaches the hand to become an extension of a tool, a precursor to holding a fork, using scissors, and, most importantly, gripping a pencil. The resistance of the tweezers provides valuable feedback to the muscles, strengthening the pads of the fingers and the web space between the thumb and index finger. This open web space is essential for a dynamic and flexible pencil grip, allowing for the small, controlled movements needed for writing.
A well-equipped « pincer grasp toolkit » can provide a scaffolded challenge to systematically build these skills. By progressing through tools of varying sizes and resistance levels, you can meet the child where they are and gradually build their strength and precision. This targeted practice is far more effective than simply hoping the skill will emerge on its own. It’s about providing the right challenge at the right time to build a solid foundation for future academic success.
Your Pincer Grasp Development Toolkit: A 5-Stage Plan
- Tool 1 (Foundational Strength): Start with spring-loaded clothespins or chip clips. Have your child clip them onto the rim of a box to build foundational hand strength using larger muscles before precision work.
- Tool 2 (Controlled Grasping): Progress to child-safe kitchen tongs with moderate resistance. Use them to transfer larger items like cotton balls or blocks to develop more controlled grasping and releasing movements.
- Tool 3 (Initial Isolation): Introduce larger, toddler-sized tweezers. Use them to pick up craft pom-poms or large beads to begin isolating thumb and index finger coordination with reduced resistance.
- Tool 4 (Refined Control): Advance to standard plastic tweezers with smaller tips. Transfer small beads or dried beans into an ice cube tray, requiring true pincer precision and refined motor control.
- Tool 5 (Mastery Challenge): For older children, graduate to metal precision tweezers to transfer tiny items like sequins or perler beads. This challenges dexterity with minimal mechanical assistance, fully preparing hand muscles for a mature pencil grip.
The 2-Year Progress Check: What Happens If Your Child Misses a Milestone?
It’s natural to feel concerned when you see other children zipping their own coats while yours is still struggling. Developmental milestones are useful guideposts, but they are not rigid deadlines. Every child develops at their own unique pace. A comprehensive Israeli study between 2019-2024 analyzed more than 5 million developmental evaluations, highlighting the wide variation in typical development. A « yellow flag »—like being a bit behind on buttoning—can often be addressed with the kinds of targeted home activities discussed in this guide. However, a « red flag »—such as a persistent lack of interest in using both hands, a regression in skills, or significant delays across multiple areas—warrants a conversation with a professional.
If your concerns persist, you might wonder who to turn to. Your pediatrician is always the first port of call. They can help determine if there’s a need for a more specialized evaluation. Often, this will lead you to one of two specialists: a Developmental Pediatrician or an Occupational Therapist (OT). While their roles can overlap, they have distinct functions. An OT is a hands-on therapist focused on building functional skills for daily life. A Developmental Pediatrician is a medical doctor who provides comprehensive diagnostic assessments and oversees a child’s overall medical care plan.
Understanding the difference can help you advocate effectively for your child and find the right support. The table below clarifies their primary roles.
| Aspect | Occupational Therapist (OT) | Developmental Pediatrician |
|---|---|---|
| Primary Focus | Building functional skills for daily activities (dressing, eating, writing, play) | Medical diagnosis and comprehensive developmental assessment |
| Assessment Approach | Evaluates fine motor, gross motor, sensory processing, and visual-motor integration | Evaluates overall development across all domains, identifies underlying medical conditions |
| Intervention Strategy | Hands-on therapy sessions with activities, exercises, and adaptive strategies | Medical management, referrals to specialists, treatment planning coordination |
| When to Consult | Concerns about specific skill delays (button fastening, pencil grip, coordination) | Persistent delays across multiple areas, need for diagnostic clarity or medical intervention |
| Collaboration Role | Implements therapeutic interventions, works with families on home strategies | Oversees medical care, coordinates multidisciplinary team approach |
Your observations as a parent are the most valuable data. Keep a simple, objective log of what you see—both the struggles and the successes. This information is incredibly helpful for any professional you consult and positions you as a collaborative, empowered partner in your child’s developmental journey.
Key Takeaways
- Fine motor skill is a hierarchy; core and shoulder stability, often built through large-scale messy art, is the essential foundation for finger control.
- Real-world skills like dressing are complex sequences. Practice components in isolation (e.g., using fasteners on a dressing board) before integrating them into the full task.
- If you have concerns, document your specific observations. An OT is your go-to for functional skill-building, while a Developmental Pediatrician provides medical diagnosis for persistent or widespread delays.
Creative Arts and Motor Skills: Why Messy Art is Essential for Writing Later
It might seem counterintuitive, but to get a child’s hands ready for the fine, controlled work of writing, you first need to let them get big and messy. Activities like finger painting, drawing on a large vertical surface (like an easel or paper taped to a wall), or playing with shaving cream are not just about sensory fun; they are essential for building the foundational stability required for fine motor control. The small muscles in the fingers can only do their job effectively if the larger muscles of the arm, shoulder, and core are strong and stable.
This is the essence of the hierarchical nature of motor development. As handwriting specialists point out, control starts from the center of the body and moves out. A stable core and strong shoulder allow for controlled movement at the elbow, which in turn allows for stability at the wrist, ultimately freeing the fingers to perform their delicate dance.
writing control is hierarchical. Large-scale messy art builds shoulder and core stability, which is the essential foundation for controlling the wrist and fingers
– Occupational therapy handwriting specialists, Dysgraphia Treatment and Handwriting Improvement Research
When a child is finger painting with big arm movements, they are strengthening their entire shoulder girdle. When they work on a vertical surface, they are engaging their core and promoting proper wrist extension—the ideal position for writing. This type of « heavy work » for the arms provides crucial input to the joints and muscles, building the postural foundation that will later allow them to sit at a desk and write without fatigue. Research consistently shows that targeted motor training, which includes these foundational activities, has a direct impact on academic skills.
Case Study: Fine Motor Training Improves Handwriting Legibility
A 2022 Malaysian study investigated the effectiveness of fine motor training on handwriting for students with special educational needs. A quasi-experimental study published on ClinicalTrials.gov demonstrated significant positive outcomes. The group receiving treatment showed an average 15-point increase on a modified Handwriting Legibility Scale, improving their performance from ‘very poor’ to ‘moderate.’ This highlights how activities that build foundational strength and coordination, including messy art, are a valuable intervention for enhancing the writing skills of children who struggle.
Building these skills is a marathon, not a sprint, and your most important role is to be a patient, encouraging, and supportive guide on their unique journey to independence.
Frequently Asked Questions About Fine Motor Skills: The Building Blocks of Independence
What is the difference between a ‘red flag’ and a ‘yellow flag’ in fine motor development?
A ‘yellow flag’ indicates a mild concern that can often be addressed through enriched home activities and monitoring—such as a slightly clumsy grasp or delayed button skills. A ‘red flag’ signals a more significant concern requiring professional consultation, such as persistent disinterest in using both hands, inability to grasp objects by expected ages, or regression of previously acquired skills.
Are developmental milestones rigid deadlines my child must meet?
No. Milestones represent population averages and typical developmental patterns, not absolute deadlines. Many milestones occur within a range of time, and each child develops at their own pace. However, significant delays or concerns about progression should be discussed with healthcare providers.
How can I be an effective partner in my child’s developmental assessment?
Keep a low-stress, objective observation log documenting your child’s abilities (not just challenges), specific situations where difficulties occur, and activities they enjoy. This positions you as a competent, collaborative partner and provides professionals with valuable context for assessment and intervention planning.